Showing posts with label birthday. Show all posts

Tuesday, October 12, 2021

More Creative Gift Wrap


After my last post, I remembered another time I needed to get creative in my gift wrapping.  My grandson was having his first birthday party.  I had bought him a very large stuffed animal and I did not have a box large enough.  I looked around my house and found a plastic toy chest I no longer needed.  Since his party theme was Super Wings, I just added some wings and a few details.  I love that the natural shape of the chest looks like a smile!  


***********

I was asked to make some boxes for decorations at the party, so this was what I came up with.  The "suitcase" was something I had created as a craft for VBS.  I just wrapped a box in kraft paper and used duct tape for the straps and handle.  Either of these would have also been good for gift wrap, but they were just decorations.


On the back of the boxes I used various birthday stamps to resemble postmarks/shipping stamps.


**********

Keeping with the theme, here is the card I made.  I made some cloud stencils and stenciled the envelope.


Friday, October 1, 2021

Creative Gift Wrap

 What do you do when you don't have any wrapping paper and you are too lazy to go to the store?  You get creative, of course!  I needed to wrap gifts for a brother and sister birthday party.  I looked around to see what materials I had available and then just let the shape of the gift dictate what I did.  (The paper for both was bulletin board paper.)


This top gift was such an odd shape.  Instead of trying to wrap that handle part, I decided it looked like a nose, so I just went with it.

*******


This box I thought was shaped like a truck or bus.  Since she would soon be starting pre-k, I decided a school bus would be appropriate.  The number 4 represented her age at the time.

I was pleased with the final results, and they were a big hit at the party.  I also had a great time making them.  Sometimes it's a good thing when you have to think outside the (gift) box.


Thursday, September 7, 2017

90th Birthday Party

My mother-in-law just celebrated her 90th year here on Earth.  We were thrilled to celebrate with her and throw her a party.  As usual, things didn't go exactly as planned and I didn't make half the decorations I had hoped to, but nobody knew that except me (and maybe anybody who saw my Pinterest board).  I made her a photo book with pictures from all throughout her lifetime.  I had it printed at Costco and used it as a guest book.  Compiling and organizing all the photos took many more hours than I care to count, so that set me way behind for the party decorations.  I've learned to just let it go and it will be fine.  The important thing is that we all had a wonderful time and she can't stop talking about it.


 This was the bulletin board I did with lots of pictures of her and her family and friends.  I'm (unofficially) in charge of bulletin boards at my church (where we had the party) and this one was due for a change, which worked out great for me.  I did this for the party and then changed it out for our Homecoming celebration the next day.  I cut out the Happy Birthday balloons and the big 90 on my Silhouette machine.  You can't tell from the picture, but the letters and numbers were cut from white glitter cardstock and the balloons were cut from three different teal cardstocks (one was embossed).  I really like how they turned out.  I wish I had gotten better photos, but we were really pushed for time just to get things set up before the guest of honor arrived.


Here is a close up of the Happy Birthday balloon banner.


It took me forever to decide on what I wanted to use for centerpieces.  (I needed ten.)  I knew I wanted to use something with photos, but I had trouble choosing exactly what.  Lack of time finally made the decision for me so I made these lanterns since I thought they would be quick.  They would have been but I had to battle with both my printer and my Silhouette machine.  Also, I wanted to be able to possibly use these again in the future, so I assembled them using repositionable glue so I could store them flat.  It worked pretty well, but it slowed things down some.  The cut file was from SVG Cuts Tiki Party set (found HERE).  I wanted it larger than I could fit on the page, so I had to make some adjustments to the file before cutting.  Inspired by a few different ideas on Pinterest, I printed on vellum two different photos and alternated with text panels for each lantern.  I also cut lots of 90 confetti and spread around everywhere.


 Of course I had to make a crown for the party princess.  She wore it proudly during the entire party.  The cut file was a freebie by Bird's Cards.  I adjusted the file to fit an adult and cut it from silver glitter cardstock.


 This was also inspired by Pinterest (both the punch and the Fountain of Youth sign).  I love Pinterest!


 Costco made the cake, but I added the 90.  I had to guess at what size to cut it since we didn't pick up the cake until right before the party, and I almost made it too big.  I cut it from glitter cardstock and mounted it on clear plastic.


Here is the gift table.  (She requested no gifts, but she is just too loved.)  I had one of my helpers scatter more photos and 90 confetti.


 I take no credit for this.  My helpers did a beautiful job with the food table. 


 Dessert Table


I picked out some of the most interesting-looking/funny photos and placed one at each table for a game.  I asked the guests at each table to work together to make up a story about their photo.  Some tables had one or two sentence stories and others had two or three pages!  LOL 
 

Friday, March 17, 2017

Landscape Timber Leprechaun


My mother was so talented.  I definitely got my love of crafting from her, but unfortunately I did not inherit much of her talent and creativity.  She always amazed me at what she could make out of ordinary trash.  We didn't have much money so we weren't able to buy much, but my mother made us such cool things I treasure to this day.  I thought this post was fitting since her birthday was on St. Patrick's Day and she painted this landscape timber leprechaun (using no pattern) over 20 years ago.  She has been gone now for 10 years and I miss her dearly.  She was an amazing woman!

Saturday, April 25, 2015

Mario Gift Bag

Two posts in one day!  Amazing!

I made this Mario gift bag for a special little boy for his 4th birthday.  He is obsessed with Mario at the moment.  I found the inspiration for my gift bag through a link on Pinterest.  (How did we ever survive without Pinterest?!)  Here is the original blog link.

I cut the various shapes on my Silhouette, but they were simple shapes that could have mostly been done with punches and/or freehand.  I used this pattern for the mustache.  I used a double layer of pop dots on the nose to give it dimension and also because I wanted to make the mustache wiggle using a homemade spring (faux Action Wobble).

Just for fun I also made a bunch of extra mustaches in three different sizes.  I applied double-sided tape to the back of each and had all the guests wear them (including the wee little ones) for a group shot. 

A special thanks to these two bloggers for helping me put a smile on a sweet little boy's face!

Sunday, October 6, 2013

T's Giraffe Wall Art

For T's birthday you can never go wrong with a giraffe.  Instead of making her a card, I wanted to go much bigger (now that I have the capability using my Silhouette Cameo).  As usual I had to relearn the little bit I knew.  I really need to make time to use it every few days at least for a while so maybe the info will stick in this old brain of mine.


The giraffe cut is from KaDoodle Bug Designs' Watch Me Grow set.  I was a bit disappointed that you can see through the yellow contact paper I used, but that's what I get for being cheap.   In fact, nothing really worked out as I planned.  I wanted to put it on the wall by her bed, but the contact paper wouldn't stick to the textured wallpaper.  The only place I could put it was on the closet door which is partially hidden by her wheelchair.  After I started assembling the giraffe parts, I realized I was not going to be able to position the "arms" the way I had planned.  (I wanted them outstretched a bit more.  Also, there was no room to put the tail, so I just left it off.  I was hoping to change out the banner for the different seasons/holidays.  We'll see if it even stays up there.

If she could talk, I know T would tell me she loves it anyway.  And she would laugh.  I miss her laugh.

Saturday, February 16, 2013

T's Birthday Card

I made this card for my sister's birthday.  She loves giraffes.  I cut an oval in the front of the card for the giraffe to peek out, and I stamped the front with a few different leaf stamps.  The monkey is from the Everyday Paper Dolls cartridge, and the giraffe is from Life's a Party. 


Wednesday, August 8, 2012

Simple, But Funny


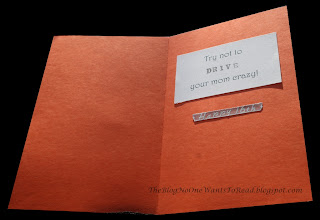
Nothing special about this card. I was just looking through my old pictures and ran across this. Looking at the simplicity of it, I'm sure I was in a giant hurry (most likely late for the birthday party) and threw it together. (Kids and teens, especially boys, only care what's inside the card anyway.) The car is the same Sizzix die I've used many times (especially for a 16th birthday). I just thought it was funny that in the picture I used he is wearing a life jacket. I used to have nightmares about running off a bridge into the lake. I guess I just wanted to make sure he was fully prepared for driving! LOL!

She's the Artist

Why is it that I've been crafting all my life (we don't need to talk about just how long that is -- trust me, it's a long time), but my daughter (who has some interest in crafting, but mostly can take it or leave it) can make beautiful cards like this? She is an incredible artist! It makes me proud and jealous at the same time (mostly just proud). These are pretty much her first attempts at cardmaking (other than just drawing pictures). I love them! She constantly amazes me with her many talents!

Saturday, August 4, 2012

C's Birthday Card

Another birthday card. This was for one of my sisters. We have a joke about the Easy Bake Ovens we got for Christmas one year when we were kids. I won't go into the whole story, but she ended up with the cute one and I ended up with an empty box (which was later exchanged for the "new" Easy Bake Oven which was plain and no where near as cute as hers). Anyway, this card was perfect for her. I spent WAY more time on the oven on the inside than I should have, but I had fun and really liked how it turned out. The girl silhouette on the front of the card and the card itself are from A Child's Year Cricut cartridge. The stove/oven on the inside was made by me using various shapes in Cricut Craft Room. I used clear plastic for the window in the oven door, a paper clip for the handle, and seed beads for the knobs. You can't tell it from these pictures, but I put Fun Foam on the stove base for more dimension. The cake is from Elmo's Party cartridge.

Friday, August 3, 2012

G is Driving! Yikes!


I made this card for my nephew's birthday -- you know ... the one every mother dreads! I think I got the map off Google maps. The car is a Sizzix die cut from a shiny plastic scrap of paper from junk mail. The headlights are cut from Crayola Stardust Paper I bought years ago at the Dollar Tree. I think I bought all they had. I don't know what I'll do when I run out of this stuff; I use it all the time. It's great for making faux lights. The boy is from Sizzix also. The license plate and "Happy 16th" are printed from Hot Rod Alphabet from Lettering Delights.

Versatile Card

I liked this card so much I've made it twice (with just slight variations) -- once for a birthday and later for a get well card. I got the background paper from one of the paper packs (couldn't tell you which one, but it was a long time ago). I think that is what I like most about the card. The butterfly is from QuicKutz. This is my go-to die for semi-quick cards. (No card is truly quick for me.) I just love this butterfly! I like to attach only the body and fold the wings for a 3-D effect. The grass is a border punch, which I inked a little for dimension. I also inked the edges of the background paper. The flower is a punch (my go-to flower punch) with two punches layered together and a flower brad in the center. The ladybug is cut from a border punch. I just used a Sharpie pen for the details.

Tuesday, December 27, 2011

Video of K's Birthday Card


Here is a video of the card in action. Details in previous post.

K's Birthday Card


This card makes me laugh! I had a blast making it, and I'm still playing with it. It is my favorite card I've made so far. I tried out two techniques I've been wanting to try for a while now. Both were so fun. The Elmo on the front is mounted on a handmade spring (like the Action Wobbles). The Elmo in the inside of the card spins. I used the Elmo's Party Cricut cartridge for the Elmos. The noses were punched with circle punches because it was just easier, but I couldn't find the layer to cut the noses anyway. The one on the back of the card is a little big and the others are a little small, but who cares. I added a party hat to the Elmo on the front using an EK Success Party Large Edger Punch, and the balloons were from the same punch. The bow on the front package is a Sizzix die cut. I used gold icicles that had fallen off our Christmas tree for the balloon strings.


On the inside, I used the EK Success Candles Edger Punch on the text box at the top. I cut the slit for the spinner on my paper cutter and just rounded the edges by hand with scissors. The gift box at the bottom is also a Sizzix die cut. I stamped Happy Birthday using a Studio G wood mounted stamp before adhering the top layer (using Pop Dots). That was a little tricky. A clear stamp would have been a lot easier. The patterned cardstock was from the Paper Studio Birthday Extravaganza Paper Pack. The solid papers were from various cardstocks and scraps I have had forever. The computer font used was One Stroke Script LET (if I'm reading that tiny print right).


I also made one of the gift bags from the Elmo's Party cartridge in which to put her money gift.