Showing posts with label Sizzix. Show all posts

Friday, October 1, 2021

Creative Gift Wrap

 What do you do when you don't have any wrapping paper and you are too lazy to go to the store?  You get creative, of course!  I needed to wrap gifts for a brother and sister birthday party.  I looked around to see what materials I had available and then just let the shape of the gift dictate what I did.  (The paper for both was bulletin board paper.)


This top gift was such an odd shape.  Instead of trying to wrap that handle part, I decided it looked like a nose, so I just went with it.

*******


This box I thought was shaped like a truck or bus.  Since she would soon be starting pre-k, I decided a school bus would be appropriate.  The number 4 represented her age at the time.

I was pleased with the final results, and they were a big hit at the party.  I also had a great time making them.  Sometimes it's a good thing when you have to think outside the (gift) box.


Friday, March 2, 2018

Yee Haw! It's a Western Theme Party!

Since I'm not doing much crafting these days, I just keep digging up past projects.  This was my table for our ladies tea at church back in 2012.  I was pleased with how it turned out.

 
This is before I added all the details. 


After adding more accessories.  It was probably a little too cluttered/busy for some people's taste, but I liked it.  😊


Here is a close up of one of the table settings.  I made the placemats from old blue jeans.  For the plates, I started with a clear glass plate and put the design on using reverse decoupage.  Working from the backside (in reverse layering), I first put the cowboy themed cutouts which were made using my Slice machine and the Happy Trails design card.  The faux leather look was created by ripping kraft paper into small pieces and inking the edges of each piece, then overlapping the pieces until the area was completely covered.  For the final layer I used bandana fabric.  Each of the layers was adhered using Mod Podge.  I added a couple of extra coats to finish it off.


These two pictures show some of the details.  I was excited to find the cactus glasses at the Dollar Tree.  I personalized each one using vinyl.  I also added vinyl cutouts to each of the coffee mugs.  The tiny cowboy boots are keychains.  I used bandanas for napkins.  The little pails were from Logan's Roadhouse.  (I saved them from their little bucket desserts.)  I filled them with peanuts.


As you can see, I used a camping lantern and rope on top of two pieces of burlap (a light piece over a dark piece) as the centerpiece.  I added the small lanterns and cacti and then scattered small stones and cowboy themed cutouts.


Here is a better shot of the cactus glass.  I added the small cowboy hat and some jute for rope.  If you look closely you can see the wagon wheel coaster under the glass.
 
I sent my guests home with their whole table setting -- cowboy hat, plate, placemat, cactus glass, bandana napkin, bucket of peanuts, and cowboy boot keychain -- everything except the coffee mugs and silverware.
 
Everyone seemed to enjoy it, especially one of my guests who is from Texas.  😊
 

Monday, October 2, 2017

Pastor Appreciation Bulletin Board - Flowers


A few years ago I did a bulletin board for Pastor Appreciation (found HERE).  This year I finally got around to replacing it with this one.  Once again I had church members write short notes of encouragement and/or appreciation to the pastor and his wife, only this time I used flowers instead of lambs.  This one was also inspired by various ideas on Pinterest (my best friend).

Although I did plan ahead a little more for this one, I still ended up rushing through the assembly.  I cut the flowers out a couple of weeks in advance and handed them out, but I had to wait for them to be returned to me before I could put it all together.  I decided the flowers needed to be inked so I did that last minute too.  Fortunately, I was able to reuse the cloud border from some previous bulletin board, and I made a similar shaped border for the bottom to resemble bushes.

Unfortunately, the photo is not very good, but I added two tiny butterflies and bent their wings to make them 3-D.  Except for the ones for the word "GROW", the flower stems and leaves were drawn after I had already stapled down the flowers.  (Definitely not the best way to do it, but I had to come back and add them later because I just ran out of time).


Friday, March 31, 2017

Ladies Tea 2011

This was from the 2011 annual Ladies Tea at church.  It was my first attempt at anything like this.  I was really outside my comfort zone and very intimidated.  Each table is decorated by a different lady (or team).  The other ladies are so creative and talented.  I won't show their tables so mine won't look so bad.  :-)

We were supposed to give each lady at our table an inexpensive favor.  I made these explosion boxes.  I had planned to give them photos from the tea to add to the inside.  Yeah, that didn't happen.  Oh well.  The ladies at my table were my friends and family and they still love me.  I didn't get a picture of the inside of the boxes because I had stayed up all night finishing the boxes and was running late.  But I do still have one so maybe I'll post more about it later.  (Update:  I posted about the explosion box here.)


I made these as place cards.  My sweet daughter wrote the names for me because she is so much better at that than I am.  The bottom one was for my niece who was 8 months pregnant at the time.  :-)

The centerpiece I made.

This shows what I did for chair covers.  I used white pillowcases over the chairs and then just added the bows and butterflies.
It was near Easter so I made the theme for mine Spring/Rebirth.  I wasn't thrilled with how it turned out, but it was ok and we all had a good time.

Tuesday, February 9, 2016

New Year Bulletin Board


Obviously this is another old bulletin board.  It was meant for the beginning of the new year, but it could be used for anytime (minus the year).  It's just a simple bulletin board encouraging church members to find what service best fits them.  The ones in the middle were highlighted and changed out weekly.

It's been so long ago I can't remember much of the details.  I do know the snowflakes were cut from sparkly prism-type paper (Crayola Stardust) which reflects the light and makes them look different colors.  I believe the puzzle pieces were cut using print and cut on the Silhouette Cameo.

Sunday, August 24, 2014

Pray for Our Students Bulletin Board


This bulletin board was inspired by one I had seen on Pinterest found  here.  Sometimes we need to be reminded to pray for our young people.  The challenges they face on a daily basis would probably surprise most of us.  Satan is attacking them from every direction.
 
The school building was cut on my Cricut using the Locker Talk cartridge.  I had a really difficult time with it.  I designed it in Cricut Craft Room and made it as large as I could using the 12x24 mat.  I cut the base from white posterboard.  I had separated out all the layer pieces by using the Hide Contour feature.  However, when I went to cut the layers, the machine just wouldn't cut.  After much frustration, I finally realized it was because some of the hidden images were hanging off the mat.  Even though I didn't want to cut those pieces, the Cricut still recognized them as all one cut.  Lots of wasted time and stress.  At that point I could have started over using my Silhouette Cameo (which will allow things to hang off the page, but wouldn't have been necessary for this project) and another schoolhouse cut file I have.  I decided instead to just color, cut, paste, and whatever else needed to be done to make this cut work.  Lesson learned.


The cute little students are from the Lettering Delights collection "Baby Got Backpack".  I was going to cut the layers, but by this time I just wanted it done.  So instead I just did a simple print and cut on my Silhouette Cameo.


The school bus was cut from the Everyday Paper Dolls Cricut cartridge.  The kids inside the bus are cut on my Sizzix using the Bitty Body die.  Their faces are stamped using the Peachy Keen Everyday Character Face Assortment.  The driver is the Sizzix original doll body.  I made him to resemble my husband who drives our church bus (although I was probably a little generous with the hair). 

I thought a chalkboard look would be appropriate for my title.  I used black cardstock and framed it out using faux woodgrain contact paper.  I wrote the title with actual chalk.

Wednesday, August 8, 2012

My Little Crafting Buddy


This adorable card was made by my granddaughter.  When she comes over we like to play with my paper crafting supplies and especially the paper dolls.  Here is one of her first projects.  She was 7 at the time.   She made a card for a friend at church.  She definitely has the crafting gene.

Simple, But Funny


Nothing special about this card. I was just looking through my old pictures and ran across this. Looking at the simplicity of it, I'm sure I was in a giant hurry (most likely late for the birthday party) and threw it together. (Kids and teens, especially boys, only care what's inside the card anyway.) The car is the same Sizzix die I've used many times (especially for a 16th birthday). I just thought it was funny that in the picture I used he is wearing a life jacket. I used to have nightmares about running off a bridge into the lake. I guess I just wanted to make sure he was fully prepared for driving! LOL!

Saturday, August 4, 2012

Ouch!


This one I did two years ago, but I liked it and I had fun with it.  I made it for my crafty sister who fell down the stairs and broke her ankle in three places.  I probably wouldn't have put this much time into a card for just anyone, but I knew she would appreciate it (and she's worth it).  The doll and clothes are Sizzix, as are the cell phone and glasses (I think).  The magazine was cut from an ad.  The chair and ottoman were drawn by my daughter.


This is rather morbid, but I thought it was funny.  I had to cut the doll apart to get the pose I wanted.  My daughter's boyfriend at the time saw the pieces and put them together like this.  I'm sure my sister felt like this during her recovery time.

Haley's Get Well Card


The monkey on this card cracks me up! Yes, he has five o'clock shadow. The more I tried to fix him, the worse he got! LOL! This card was for a little girl at church who had surgery. The card base is one of the box cards. The monkey is from New Arrival Cricut cartridge. I added googly eyes for fun. The vines were just cut from circles which were a Sizzix die I think. The leaves are also Sizzix. The monkey is just hanging freely from the vines (not glued down). The monkey on the inside is on a homemade version of an Action Wobble.

Friday, August 3, 2012

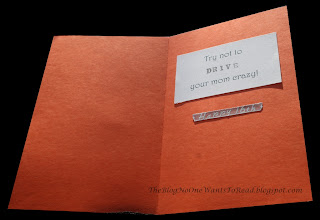
G is Driving! Yikes!


I made this card for my nephew's birthday -- you know ... the one every mother dreads! I think I got the map off Google maps. The car is a Sizzix die cut from a shiny plastic scrap of paper from junk mail. The headlights are cut from Crayola Stardust Paper I bought years ago at the Dollar Tree. I think I bought all they had. I don't know what I'll do when I run out of this stuff; I use it all the time. It's great for making faux lights. The boy is from Sizzix also. The license plate and "Happy 16th" are printed from Hot Rod Alphabet from Lettering Delights.

Catch Up Time

Well, I've been extremely busy lately, so I'm going to try to catch up somewhat. I'll be posting some of the things I've made recently (if I can remember how). This first one is a quick card I made about a year ago for my pastor's mother who was sick. The fence is a Sizzix die and the flowers, grass and dragonfly are from various punches.

Tuesday, December 27, 2011

Video of K's Birthday Card


Here is a video of the card in action. Details in previous post.

K's Birthday Card


This card makes me laugh! I had a blast making it, and I'm still playing with it. It is my favorite card I've made so far. I tried out two techniques I've been wanting to try for a while now. Both were so fun. The Elmo on the front is mounted on a handmade spring (like the Action Wobbles). The Elmo in the inside of the card spins. I used the Elmo's Party Cricut cartridge for the Elmos. The noses were punched with circle punches because it was just easier, but I couldn't find the layer to cut the noses anyway. The one on the back of the card is a little big and the others are a little small, but who cares. I added a party hat to the Elmo on the front using an EK Success Party Large Edger Punch, and the balloons were from the same punch. The bow on the front package is a Sizzix die cut. I used gold icicles that had fallen off our Christmas tree for the balloon strings.


On the inside, I used the EK Success Candles Edger Punch on the text box at the top. I cut the slit for the spinner on my paper cutter and just rounded the edges by hand with scissors. The gift box at the bottom is also a Sizzix die cut. I stamped Happy Birthday using a Studio G wood mounted stamp before adhering the top layer (using Pop Dots). That was a little tricky. A clear stamp would have been a lot easier. The patterned cardstock was from the Paper Studio Birthday Extravaganza Paper Pack. The solid papers were from various cardstocks and scraps I have had forever. The computer font used was One Stroke Script LET (if I'm reading that tiny print right).


I also made one of the gift bags from the Elmo's Party cartridge in which to put her money gift.